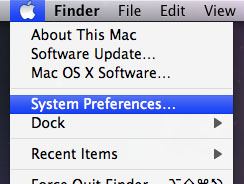
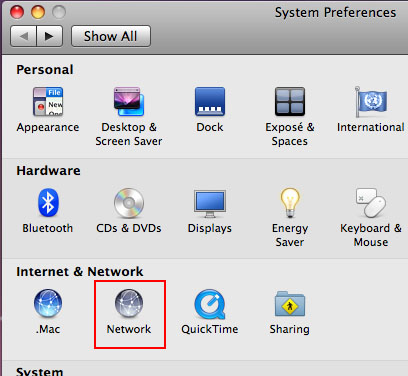
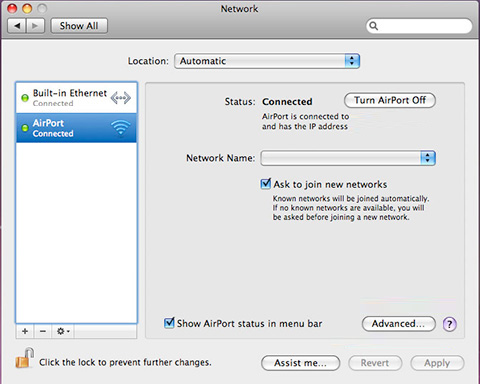
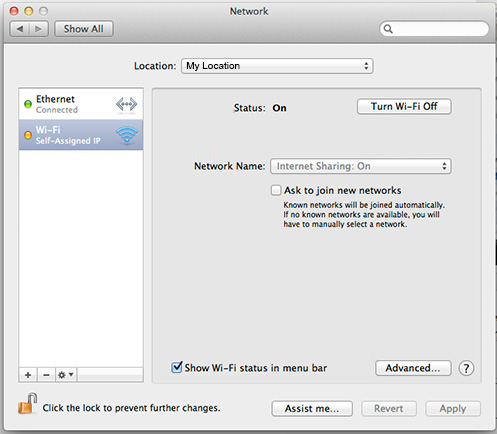
Please enter your information below so we can put you in contact with a representative that can answer your questions, help you with a problem, and listen to your comments. Let us know how we can go one step further for you.
Thank you for contacting us! At Spartan-Net, we appreciate your valuable time and strive to provide an accurate and timely response to every request we receive.
Ticket # has been created for your inquiry. One of our team members will research and fully respond to your matter as soon as possible.
You will need your apartment address to begin subscription process.
After subscription has been submitted, it will be sent for processing. Once completed, you will receive an email or SMS. If you subscribed within two days prior to your move-in date, service will be on at move-in.
Connecting directly to the wall outlets will provided the fastest speeds available.
You will need an Ethernet cable to connect.
Watch this video for easy set up!
Standard Connections
How To
Community WiFi
Many communities offer Community WiFii that allows you to connect to the Internet without your own WiFi router.
Check to see if your community has WiFi available.
No equipment needed. Just add your devices on your account and instantly connect.
Consistent blazing fast Internet at-home and on-the-go.
Setup once, stay connected and say goodbye to overage fees!
No need to ask for WiFi passwords when changing locations.
My own WIFI router
Plug an Ethernet cord directly into the wall outlet and follow your router setup.
Wired Desktop or Laptop
Plug an Ethernet cord from your desktop or laptop into the wall outlet.
If you are unable to connect, call 866-386-7778 or create a Support Request
Your apartment may have a multicolored panel for connecting to the Internet. It is typically located in the living room, hall closet or utility closet.
There are three common options for configuring your apartment as shown below.
Activate a single outlet
Each room is color coded. Plug an Ethernet cable from the blue data port to the corresponding port color of the room that you want internet.
Connecting directly to the wall outlets will provided the fastest speeds available.
You will need an Ethernet cable to connect.
WiFi router
Use an Ethernet cable to connect the blue port to the Internet/WAN port on your wireless router.
Activate multiple outlets
Connect the blue data port to the internet/WAN port on your wireless router. Each room is color coded. Connect them to your wireless router or network switch.
Each roommate should create their own login for the account. Primary account holder, log in to My Account and click the 'Roommates' tab.
If you are still unable to connect, call 866-386-7778 or create a Support Request
No equipment needed, just add your devices on your account and instantly connect.
Once authorized, you will have access to ultra-high speed WiFi at any of Spartan Net’s communities. Setup once, stay connected and say goodbye to overage fees.
No more worrying about using up your data or asking your friends for their long WiFi passwords.
129 Burcham
731 Burcham
787 Burcham
Abbott Pointe
Albert Apartments
Americana A
Americana B
Arbor Glen
Beechwood
Berrytreee
Burcham Place
Burcham Woods
Campus Hill
Campus View
Cedar Greens
Cedar Street
Cedar Village
Delta Arms
Eden Roc
Glenwood
Hannah Lofts
Knob Hill
Hannah Lofts
Haslett Arms
Northpointe
Old Canton
River Park
Studio House
The Hamptons
The Oaks
The Pines
University Terrace
University Villa
Waterbury Place
Waters Edge
Requirements:
Even if Internet and TV is included at your apartment you must Subscribed to activate service.
Once you receive email notification that your My Account is active you can add your WiFi devices. You can then add roommates in My Account to allow them access to setup their own login to add WiFi devices.
2. Click the ‘WiFi’ tab to add devices
To authorize devices, label them in the description field..Enter the MAC address of your device and press Save. Most communities are limited to 3 registered WiFi devices per roommate.
Help finding the MAC Address
The MAC Address is a sequence of 12 alphanumeric characters located in your device settings.
Example: 00:00:00:a1:2b:cc
Need help, what kind of device are you connecting?
3. Connect to community WiFi
Connect to Spartan-Net. The guest WiFi SSID automatically times out and requires manual re-connection.
Next Steps…
Each roommate gets access to add their own WiFi devices.
After you add your devices, go to the roommates tab in your My Account and add your roommates. Once added Roommates can setup individual accounts to add WiFi devices at www.Spartan-Net.com/Register
For the fastest speeds.
Plug in an Ethernet cable from your computer directly into the wall Internet port.
Screen Casting and Wireless Printing.
Apple AirPlay, Google casting and wireless printer connections are not accessible on the Spartan Net WiFi network due to enhanced security. If you wish to use these capabilities, you will need your own WiFi router.
If you are still unable to connect, call 866-386-7778 or create a Support Request
The following instructions will help you locate your MAC address. Registering your devices MAC address is required in order to access Spartan Net Community WiFi. Once you locate your MAC address, login to your My Account and add your devices. For further instructions on how to connect to WiFi, click here.
MacOs X Leopard - Wireless Network
1. Click the Apple in the upper-left corner and select System Preferences.
2. Double click the Network icon.
3. Click Airport and choose Advanced.
4. Click the Airport tab. Your MAC address is the Airport ID.
MacOs X Lion - Wireless Network
1. Click the Apple in the upper-left corner and select System Preferences.
2. Double click the Network icon.
3. Click Wi-Fi and choose Advanced.
4. Click the Wi-Fi tab. Your MAC address is the Wi-Fi Address.
Windows Computer
1. Click the Start menu button on the Windows task bar.
2. Type 'Run' in the search bar, then open the program 'Run' by clicking on it.
3. Type 'cmd' in the text box that appears and click 'OK'. A command prompt window launches on the desktop.
4. In this command window, type 'ipconfig /all' and press 'Enter' on your keyboard.
Details are shown for each of the computer's network adapters.
You may see multiple entries so be sure to use the one labeled Wireless LAN Adapter Wi-Fi.
5. The 'Physical Address' field states the MAC address for that adapter.
The following instructions will help you locate your MAC address. Registering your devices MAC address is required in order to access Spartan Net Community WiFi. Once you locate your MAC address, login to your My Account and add your devices. For further instructions on how to connect to WiFi, click here.
Amazon Kindle Fire
1. From the home screen, tap on the Settings icon, which is located in the top right corner.
2. Tap on Settings.
3. Tap on Device.
4. You should now see your MAC address.
Android
Depending on your Android device, please try one of the following lists of steps:
1. On the Home screen, tap the Menu button and go to Settings.
2. Tap About Phone.
3. Tap Hardware Information (under Status on Android version 2.3).
4. Scroll down to see your WiFi MAC address.
1. On the Home screen, tap the Menu button and go to Settings.
2. Tap Wireless and network.
3. Select WiFi Settings to see your WiFi MAC address.
Blackberry
1. Go to Options Menu.
2. Tap on Status.
3. Your should now see your MAC Address.
iOS
1. From the Home screen on your device, tap the Settings button.
2. Tap General and then About.
3. The MAC address is located at the Wi-Fi Address section.
Windows Phone 8
1. On your Windows Phone 8, open the App list, and tap on Settings.
2. Tap on about in system settings.
3. Tap on the more info button.
4. You will now see the MAC address of your Windows Phone 8.
The following instructions will help you locate your MAC address. Registering your devices MAC address is required in order to access Spartan Net Community WiFi. Once you locate your MAC address, login to your My Account and add your devices. For further instructions on how to connect to WiFi, click here.
Apple TV
1. Go to the main menu on your Apple TV device, and select Settings
2. Select About from the menu for the network information.
3. Here you can find your MAC Address, listed as either the Wireless or Ethernet (depending on the connection you are using)
Alternative Method for Locating the Wireless MAC Address
The Apple TV Ethernet (wired) and Wireless network MAC addresses can be found on the UPC label on the Apple TV box as Ethernet and Wireless ID.
Roku
1. From the Home screen, select “Settings“.
2. Select “About“.
3. The “Wireless MAC address” will be displayed on the screen. If you use a wired connection, you'll be interested in the “Ethernet MAC address”.
The following instructions will help you locate your MAC address. Registering your devices MAC address is required in order to access Spartan Net Community WiFi. Once you locate your MAC address, login to your My Account and add your devices. For further instructions on how to connect to WiFi, click here.
PS2
Depending on your Playstation 2 model, please try one of the following lists of steps:
Original
To find the MAC address of your Sony PlayStation 2 you will need the Network Adaptor connected to the PS2 and you will need the disc that came with the Network Adaptor.
1. Power up the PlayStation2 and load the Network Adaptor Startup Disc, once it has loaded, select ISP Setup and press X on your controller.
2. The ISP Setup will begin to load, and you will be presented with a license agreement. Select Agree and press X to continue. For connection type, choose Local Area Network (LAN) and press X to continue.
3. Select Automatic Configuration and press X to continue.
4. At the connection test screen, select Advanced and press X to continue.
5. At the Advanced Broadband Settings screen, make sure "Automatic" is selected.While you are at this screen, make note of the MAC address at the bottom.
Slim Model
The process differs slightly with the slim version of the PS2. With the slim version, follow these directions:
1. Turn on the console without a game in the tray.
2. Press the triangle to show the version information.
3. Your MAC address should be displayed near the bottom.
PS3
1. Turn on your Playstation 3 without any disk in the drive.
2. Navigate to the Settings icon (located on the far left). Press the X button.
3. Select Network Settings with the X button.
4. Select Settings and Connection Status List with the X button and you will see your MAC Address.
PS4
1. Turn on your Playstation 4 without any disk in the drive.
2. Navigate to the Settings icon.
3. Select the System icon under the Settings menu.
4. Select System Information.
5. You should now see your MAC Address.
PSP
1. Navigate to System Settings.
2. Then navigate to System Information.
3. You should now see your MAC Address.
Wii
1. From the home screen, select the Wii button in the lower left hand corner.
2. Select Wii Settings.
3. Select the right arrow to advance to the 2nd set of settings and select the Internet option.
4. Select the Console Information option.
5. You should now see your MAC Address
Wii U
1. On your Wii U, go to the Wii U Menu and select System Setting.
2. Choose the option Internet.
2. Select View MAC Address
Xbox
1. Turn on your Xbox console with no game disc in the disc tray.
2. From the Xbox Dashboard, choose Settings.
3. From the Settings screen, select Network Settings.
4. Select IP Address and confirm the configuration is set to automatic.
5. Go back to Network Settings. Select DNS Servers to confirm that configuration is set to automatic.
6. Back at the Network Settings window, the MAC address is located at the bottom right corner.
Xbox 360
1. Go to the System area of the Xbox Dashboard and select Network Settings.
2. Select Edit Settings.
3. Under Basic Settings, check to make sure the IP Settings is on Automatic.
4. Now go to Additional Settings, select Advanced Settings.
5. At the bottom of this screen, you will see your MAC Address.
Xbox One
1. If you are signed into your profile, navigate to My Games & Apps. Skip this step if you are not signed into a profile.
2. Select Settings.
3. In the settings pane, select Network.
4. Select Advanced Settings.
5. Your MAC address should be displayed on this screen.
Routers
No need to register anything for routers.
Just plug it into the data port with your Ethernet cable and follow your manufactures setup instructions.
After the primary account holder subscribes and the account is active the primary account holder can login to Spartan Net My Account and click ‘Add Roommates’. Roommates can then create a roommate login and add WiFi devices.
Save on your wireless data plan by streaming at home and at other Spartan Net powered communities.
Instantly connect when you're in range of Spartan Net WiFi hotspots.
Ability to open support tickets.
Roommates Account Types.
Standard: provides access to technical support and adding WiFi devices. By default they are setup with standard access.
Standard Plus: Standard options plus they can manage billing and service changes.
Community WiFi Access
Each occupant should add their own WiFi devices under their own accounts. Create a roommate login and add WiFi devices.
Many factors can affect your Internet connection speed. All your connected and active devices share your Internet connection. The more devices downloading, streaming, or gaming, the more likely you could notice slower speeds.
Things that may affect your Internet speed
Speed of the websites and services you are connecting to
Laptop computer or device speed.
Streaming video and other bandwidth-intensive uses.
Take full advantage of your Gigabit speeds and ensure that you are getting optimum performance by following our recommendations.
Connecting to the Internet directly with an ethernet cord from your device to the wall data port will always provide faster speeds, lower latency, and a more stable connection than any wireless options. We give you the steps on how to do it.
Wireless connections
Make sure you are connected to the SSID ‘Spartan-Net’ for the fastest wireless connection.
Depending on the age of your device, you may be connecting to a slower WiFi spectrum.
Recommended WiFi Routers
If you are purchasing your own WiFi router our favorite top of the line wireless router is the ASUS AC68U
Your Computer
Increase your computer's performance to get the most from your Internet connection.
Rebooting your computer
Turn your computer off and back on periodically. Rebooting will close programs that run in the background.
VPN and Internet proxy servers
Virtual Private Network (VPN) connections to your office as well as connections to Internet proxy servers can decrease performance.
Clear your browser's cache
Periodically clearing your cache will improve your web browsers performance.
How to clear browser history, cookies, and cache:
Launch your Web browser.
Press Ctrl+Shift+Delete.
Select the items you'd like to clear from the browsing history menu.
Select the Delete or Clear button, depending on your browser type.
Close and re-start your browser.
Less open applications
Minimize the number of applications running simultaneously along with the number of tabs opened in your browser.
Peer-to-peer file sharing
File-sharing applications typically run in the background on your computer and use your Internet connection to upload and download files. Closing these applications on all the computers in your home may improve your performance.
Try a few quick tips to troubleshoot your issue. Connect a gaming console?
Error 400-Bad Request
There may be an issue with the website you are trying to reach.
This error occurs when the server does not recognize the URL.
Solution: Please double check to see that you have typed the URL correctly. If you have then try restarting your computer.
Error 401-Unauthorized User
This error occurs when you do not enter the correct ID or password to access a protected website.
Solution: Please revisit the website and ensure that you are using the correct ID and password. If you are, you may want to contact the website administrator for more assistance.
Error 403- Forbidden Pages
This error occurs when the website refuses to respond, typically as a result of insufficient permissions.
Solution: Please ensure that you are using the correct ID or password to access the website. If you are, you may want to contact the website administrator for more assistance.
Error 404-Not Found
This error occurs when the page you are trying to access has been deleted or its name has been changed or modified on the server.
Solution: You can try deleting portions of the URL, starting at the end, and see what comes up or you may want to contact the website administrator for more assistance.
Error 415-Unsupported Media Type
This error occurs when the server doesn’t support the media type being used.
Solution: Please ensure that you are using the correct file format and try again.
Error 500-Internal Server Error
This error occurs when the website you’re trying to reach has an internal server error.
Solution: Please try the website again later or contact the website administrator for more assistance.
Error 501-Not Implemented
This error occurs when the website doesn’t support the feature you have requested, typically this happens with forms.
Solution: Please try the website again later or contact the website administrator for more assistance.
Error 502-Bad Gateway
This error occurs when the website has refused the connection.
Solution: Please refresh the page or try the website again later. If the error continues, please contact the website administrator for more assistance.
Error 503-Service Unavailable
This error occurs when the website is unavailable.
Solution: Please refresh the page or try the website again later. If the error continues, please contact the website administrator for more assistance.
If you are still unable to connect, call 866-386-7778 or create a Support Request
If you are using a gaming console and experience connection or NAT type issues, you may be at a community with NAT turned on. You can try to resolve this by doing the following:
1. If you are connecting through your own router and experiencing gaming issues try plugging your game console directly into a wall port and restart your game console.
2. If you are connecting through your own router and cannot plug directly into the wall, try unplugging/disconnecting from your own router and connecting over community wifi and rebooting your console.
3. If you are already connected by one of the aforementioned methods try rebooting your console.
4. If you still experience problems Spartan Net Network Operations Center will need to disable NAT’ing.
Lower latency in games and less chance of disconnections.
Smooth video chats
Request an open NAT type
Once your NAT type is changed to open, follow these simple steps:
o If your gaming system is plugged directly into the wall, i.e. not using a personal router, reboot your gaming system.
o If you have a personal router that your gaming system is plugged into, reboot your router.
With the evolution of our company and expansion of our network, we needed our name and brand to reflect not only where we are but where we're headed. A name that embodies what we have always strived for: stellar service and stellar products. That's why it's with great excitement that we embark on this journey with you as STELLAR Broadband.